Supported ADP Versions
- ADP RUN
- ADP Total Source
- ADP Workforce Now
Before You Export: Map Your Pay Codes
For ADP to accept your file, the earnings codes in it must match the pay codes set up in your ADP account. For ADP RUN and ADP Total Source, you can set this up yourself in Hour Timesheet:
- Ask ADP for the list of pay/earnings codes your ADP account expects (for example
REG,OT,VAC). - In Hour Timesheet, open Accounting > Codes > Manage Pay Types and enter each ADP code as the Alias on the matching pay type.
- In your export settings, set the mapping dropdown to Alias Name (the field is called Earning Code/Pay Type Mapping for ADP RUN and Hours Code/Pay Type Mapping for ADP Total Source).
If a pay type has no alias, the export falls back to the pay type’s name (for example “Hourly”), which ADP may not recognize. ADP Workforce Now works differently: map your pay types in the Pay Type References table on its export settings panel instead. If you have questions about this setup, contact support@hourtimesheet.com.
Saving ADP Exporting Settings (A One-time Requirement)
Timesheet data created in Hour Timesheet can be exported to ADP using a csv file. To set up exporting:
- Login to Hour Timesheet as a user with the admin or accountant role
- Navigate to Export > Export Settings (the page is titled Payroll Settings)
- Payroll System - Select your ADP version (ADP RUN, ADP Total Source, or ADP Workforce Now)
- Complete the settings fields for your version. For ADP RUN:
- File Identifier - Hour Timesheet generates this automatically (it is written as the first row of the export file, e.g.
HTS V1.0) and increments it after each export. Check Use Fixed Identifier to set your own. It applies to the Legacy file format only — see the next section. - Pay Frequency - Select from Weekly, Bi-Weekly, Semi-Monthly, Monthly or Quarterly
- Enter the Company Code/Client Code
- Earning Code/Pay Type Mapping - choose how earnings codes are filled (see Before You Export: Map Your Pay Codes above)
- File Identifier - Hour Timesheet generates this automatically (it is written as the first row of the export file, e.g.
- Click Save
ADP RUN: Choosing a File Format
Hour Timesheet can produce the ADP RUN import file in three layouts. The ADP File Format setting is on the same Export > Export Settings page (Payroll System: ADP RUN):
- Legacy (Not Recommended) — the original Hour Timesheet layout. Existing ADP RUN accounts remain on Legacy automatically; your export files do not change unless you change this setting.
- V1 (Standard) — ADP’s standard import layout (ADP calls it
##GENERIC## V1.0— you may see that name in your ADP RUN import setup). New ADP RUN setups start on V1. - V2 (Beta) — ADP’s
##GENERIC## V2.0import layout: the V1 columns plus a Job Code column. V2 is newly released — confirm the results with ADP on your first import.
The format you select must match the file layout your ADP RUN import is set up to accept. If your current exports already import into ADP successfully, check with ADP before changing this setting.
Note: the File Identifier field applies to the Legacy format only. V1 and V2 files begin with a fixed ##GENERIC## identifier row instead, so the field is hidden when those formats are selected. The field reappears if you switch back to Legacy.
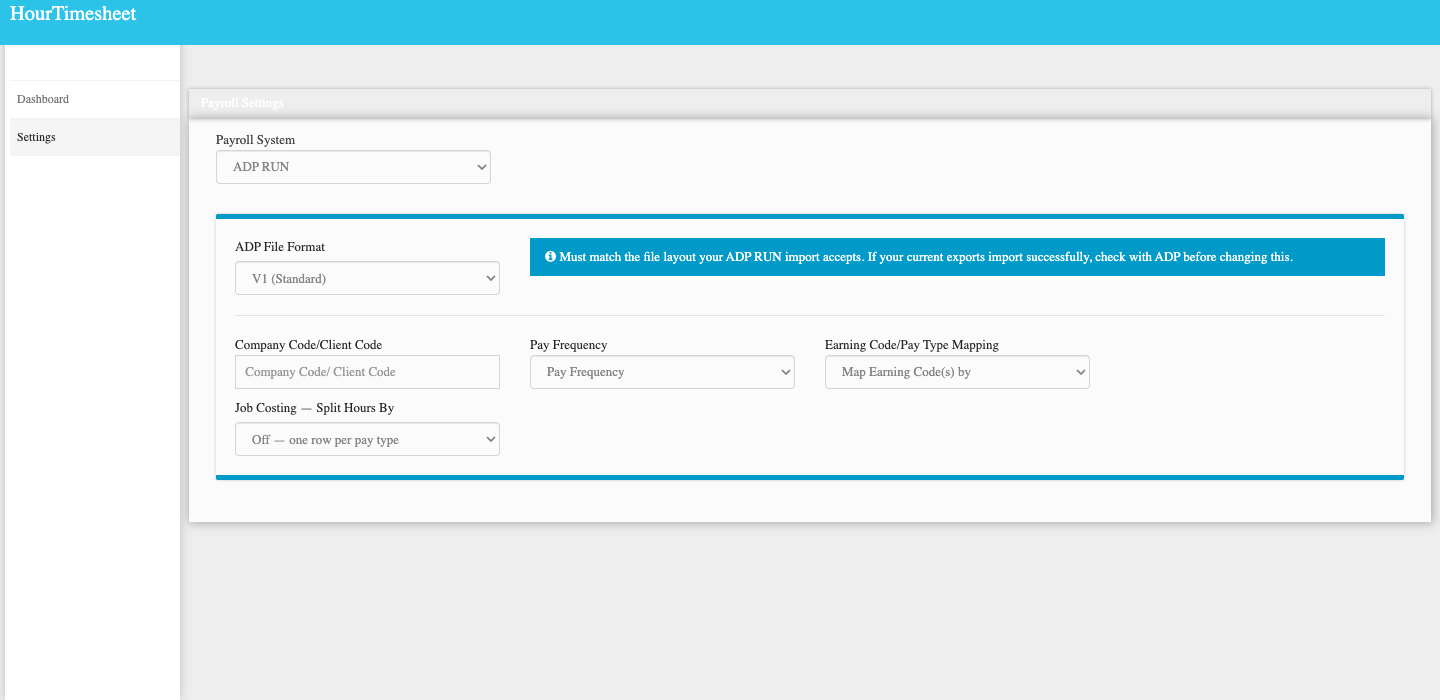
ADP RUN: Job Costing (One Row Per Project or Job)
By default, the ADP RUN export contains one row per employee per pay type, with all of that employee’s hours combined. If you allocate labor to projects or jobs in ADP, you can instead have Hour Timesheet split each employee’s hours into one row per project:
- Job Costing — Split Hours By: select one of your charge code types (for example, Project). The export will then contain a separate row for each charge of that type, with the project’s name carried in the file. Selecting Off returns to one combined row per pay type.
- Send … To Column: this second field appears once you choose a Split Hours By option, and it is named after your selection (for example, Send Project To Column). Use it to choose which column of the ADP file carries the project name: Worked Department (available in every format) or Job Code (available with the V2 (Beta) format only).
Before enabling Job Costing, please confirm with ADP:
- which column (Worked Department or Job Code) your ADP RUN account uses for labor allocation, and
- that the matching departments or jobs are set up in your ADP RUN account — ADP may ignore or reject codes it does not recognize.
Important: make sure all of your projects are entered in Hour Timesheet under the charge code type you select for the split — charges entered under a different charge code type are not broken out separately, so hours on those charges would stay combined. If you later rename a charge code type, revisit this setting and save it again.
Job Costing is off by default. Existing accounts are unaffected until an administrator or accountant turns it on.
Exporting Timesheet Data to ADP
Navigate to Export > Export Time. Place a check in the box next to the timesheet(s) that you would like to export
- Click the Export Selected button to begin the export.
- A pop-up will ask you to select the payroll system. You can also check Also mark selected timesheets as processed.
- Select your ADP version and click Download CSV
- Contact ADP to activate the Time Sheet Import feature in your account
Custom Export [Video clip]